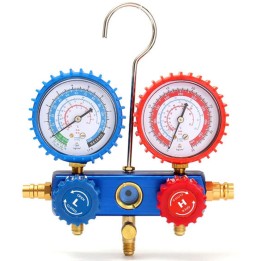








Bridge Gauge Case 410A X 285 X 92Mm Standard Padded Suitcase images
Bridge Gauge Case 410A X 285 X 92Mm Standard Padded Suitcase
GSOXY012 ✅ HOW TO USE A GAS ANALYSER When charging gas, we will need several measuring devices and some tools.
✅ There are several methods for adjusting the refrigerant charge, as well as the procedure for charging a unit.
✅ First and foremost, we will need a pressure analyser; the two-valve analyser is normally used, but it should be noted that four- and five-valve versions are also available on the market.
✅ The analyser has two valves, one for low pressure (low pressure) and one for high pressure (high pressure).
✅ Two pressure gauges: a blue one that indicates the low pressure, whose range is usually 0 to 10 bar and which includes several pressure-temperature scales for the most common gases (R 22, R 134a, R 407C); the other gauge is red and indicates the high pressure, its range is usually 0 to 30 bar, and as with the low-pressure gauge it also includes several temperature scales for the aforementioned gases.
✅ The analyser has three sae ¼ threaded couplings for gases such as R 22, R134a, R 404 and R 407C; for R 410C gas, 5/16 threaded couplings must be used as it works at higher pressures.
✅ Hoses are connected to these three threads: one connecting the low-pressure side of the refrigeration unit to the low-pressure gauge (blue), another connecting the high-pressure side of the refrigeration unit to the high-pressure gauge (red), and a hose connected to the central thread that is used as the service hose, which will be yellow; the refrigerant gas cylinder is connected to this yellow hose.
✅ It also includes a sight glass where the flow of refrigerant can be seen.
✅ First, a series of precautions will be followed: check that none of the couplings have damaged threads, dirt, dust, oil or grease.
✅ Check that there is no dust on the gauge glasses; if there is, use a clean cloth, and under no circumstances clean them with harsh detergents or disinfectants.
✅ Second, the hoses will be purged.
✅ The yellow hose is connected to the refrigerant cylinder, which will be closed.
✅ The low-pressure (blue) hose is connected to the refrigeration system.
✅ The cylinder is opened.
✅ When the hoses are full of gas, the air in them is purged.
✅ We will carry out the same operation for the high-pressure (red) hose.
✅ Charging can be done on the low or the high side: On the low-pressure side (pure or azeotropic gases) the yellow hose is connected to the refrigerant gas cylinder, the system is purged and saturated with gas, and once the pressures equalise the refrigeration unit is started and the low-pressure analyser valve is opened so that the system itself draws the gas into the unit.
✅ The cylinder can be heated to raise its temperature and, in turn, its pressure, so that gas can be introduced more quickly.
✅ This is the most commonly used method since the superheat and subcooling of the refrigeration circuit can be measured as you go and adjusted without needing to know the final weight of refrigerant; another indicator that will help us know whether the charge is correct is the compressor's current draw, as well as the temperature differences that can be measured across the heat exchangers.
✅ Approximate values for refrigeration equipment are: Superheat Between 5 ºC and 12 ºC Subcooling Between 5 ºC and 12 ºC Temperature difference across air heat exchangers Approximately 10 ºC Temperature difference across water heat exchangers Approximately 5 ºC Electrical consumption Below the rated current.
-
Brand

-
ReferenceGSOXY012
GSOXY012 


4 other products in the same category
- Out of stock - available soon